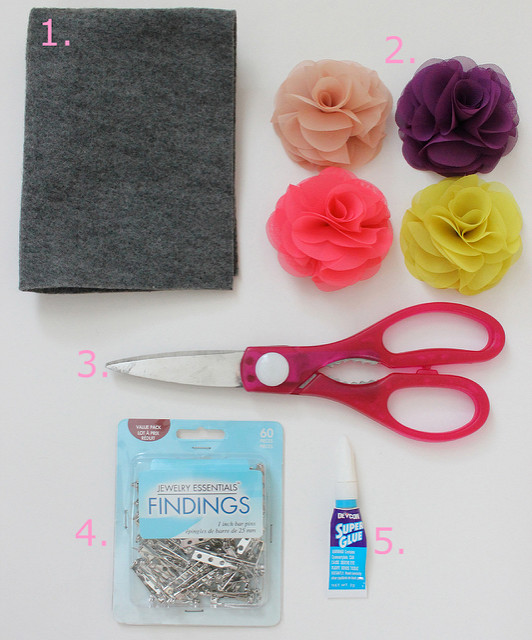
Please bear with me since this is my first attempt at a DIY (do it yourself) project. Not sure if this project even qualifies but I was happy with the end result so hopefully it will help at least one person. I now just realized I forgot to take a picture of the very first step (eeks)! Well since I can’t go back, I will make sure to explain thoroughly. Here are all my supplies used:
1. Michael’s gray felt – $0.29 for 1 large sheet
2. J.Crew flower hair pins- $9.50 each (recent and in-store)
3. Scissors
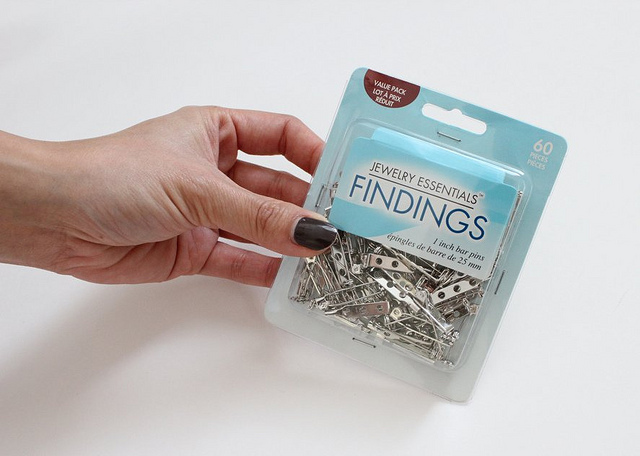
4. Michael’s 1″ bar pins (size depending on flower pin/brooch)- $2.99 for a 60 pack **use 40% or 50% off coupon**
5. Super glue (any strong adhesive will work)
STEP 1: Snip off the hair clip in the back
Please note that I forgot to take a picture of the back of the J.Crew pin before snipping off the hair clip in the back. This particular hair pin did NOT come with the pin back like the majority of flower hair pins/brooches therefore this explains why I am doing this post. I love my LOFT flower pin so much that this was the closest thing I could find in the same size and style. The following steps are for AFTER you snip off the hair clip. My dad was able to do that for me with a strong pliers and also filed down the tips of the left over metal just to be safe. Ladies- make sure to have your hubby or BF help you with this:)
STEP 2:
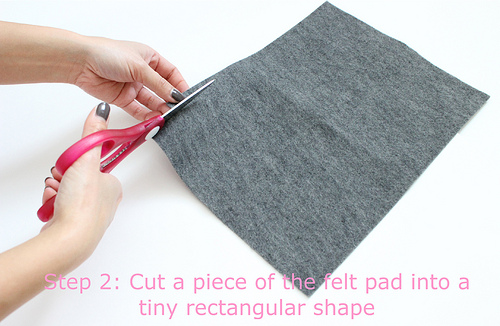
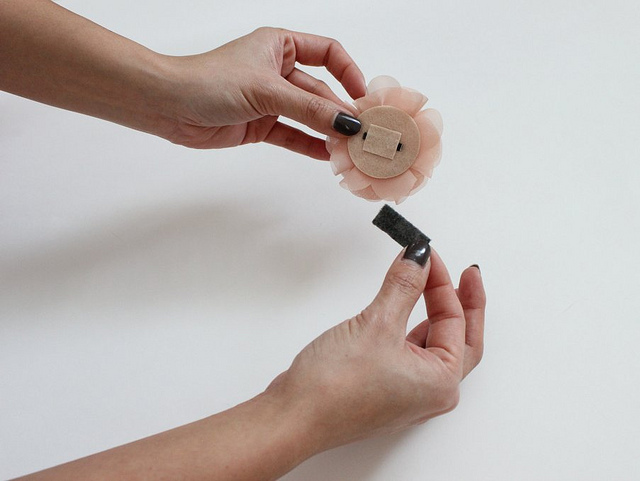
I chose the color gray for my felt but you can opt to match your felt with your flower pin (personal preference). I didn’t really care since no one will see it but some may want it to match perfectly. Michael’s has a variety of colors to choose from.
You will want to measure how big of a rectangular piece you will need. I eyeballed it but you can be more precise and use a ruler to make sure you have enough felt to cover the leftover metal hair pin.
Make sure to test it out the size before proceeding to the next step.
STEP 3:
Remove one bar pin from package…(I know sounds silly but I like to be as thorough as possible).
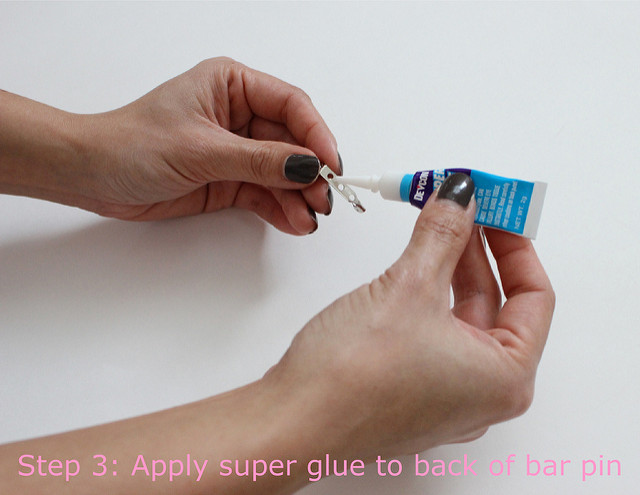
Put a small amount of super glue on the entire area of the back of the bar pin. Do this carefully and with caution! Do not put too much because it will get messy, just enough to adhere to the back of the flower pin.
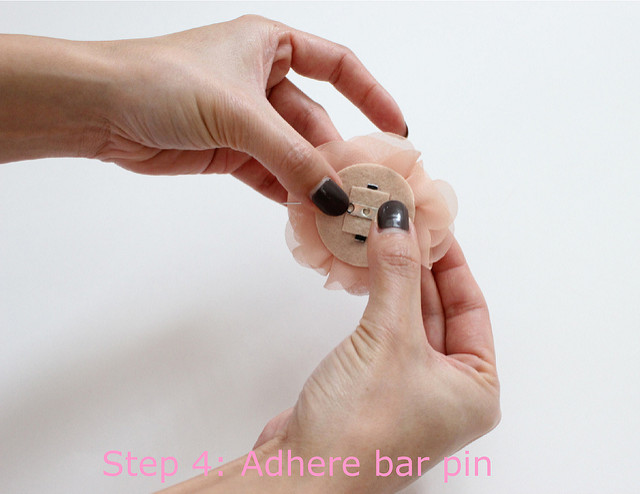
STEP 4:
Open safety pin and make sure to place the bar pin horizontally (opposite direction of previous hair clip). You will see why in the next step. Hold in place for 1-2 minutes so the super glue to adhere properly. Be careful because your fingers may get stuck.
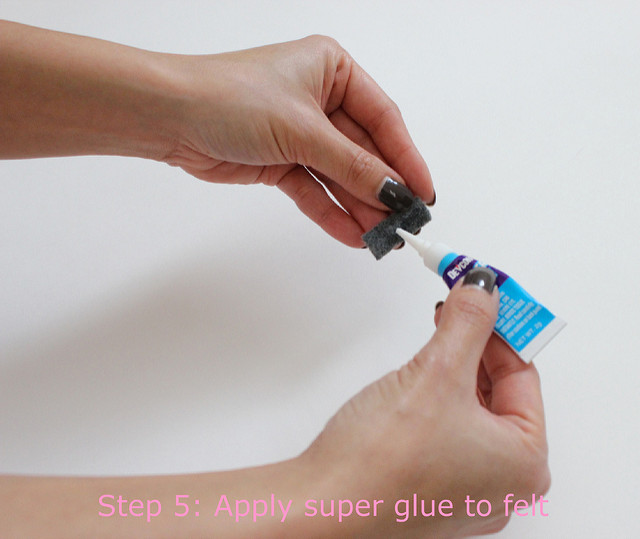
STEP 5:
Apply super glue to one side of the rectangular felt piece (preferably the smooth side). There are 2 sides to a piece of felt. One side feels smoother, I figured it would adhere better if it wasn’t as rough. I could be wrong but just went with my gut.
STEP 6:
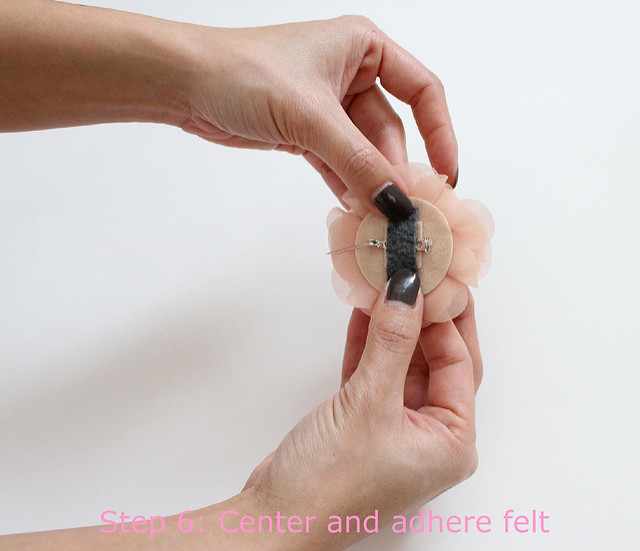
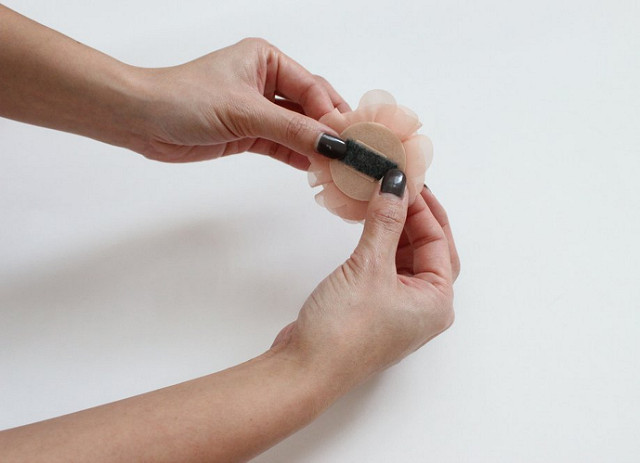
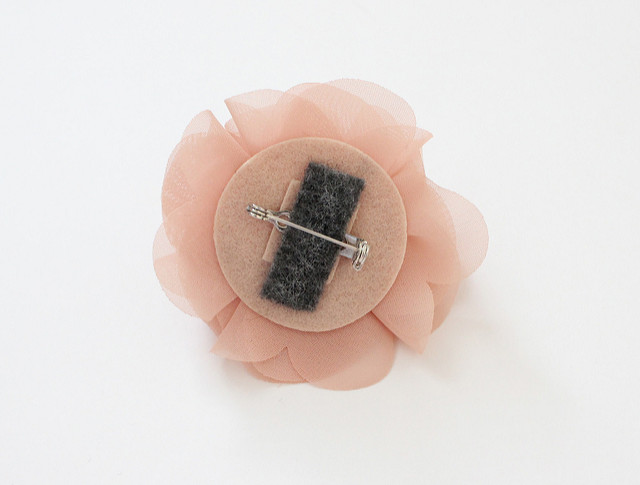
You want to make sure to cover up the leftover metal from the hair clip and also this adds another layer of adhesive to keep the bar pin in place. Be sure to open the bar safety pin before adhering. Hold in place for 1-2 minutes. I held it for 2-3 just to be safe.
STEP 6:

You want to make sure to cover up the leftover metal from the hair clip and also this adds another layer of adhesive to keep the bar pin in place. Be sure to open the bar safety pin before adhering. Hold in place for 1-2 minutes. I held it for 2-3 just to be safe.
Voila! You are done. You have successfully turned a hair pin into a brooch! For reference, these pins measure 3″ x 3″ which is the perfect size for a flower pin (IMO). You all know how much I love my flower pins and wear them quite often. I searched and scoured for a similar one to my LOFT flower felt pin that I love so much and nothing comes close. When I came across these at J.Crew, I was quite disappointed to see that they did not come with a pin attached to wear as a brooch. I figured I would take a stab at doing it myself and I am super glad I did! I am very un-talented when it comes to crafts or DIY projects so hope this wasn’t too painful to read. I am not even 100% sure this is the proper way to do this but it worked for me so I thought I would pass it along:)
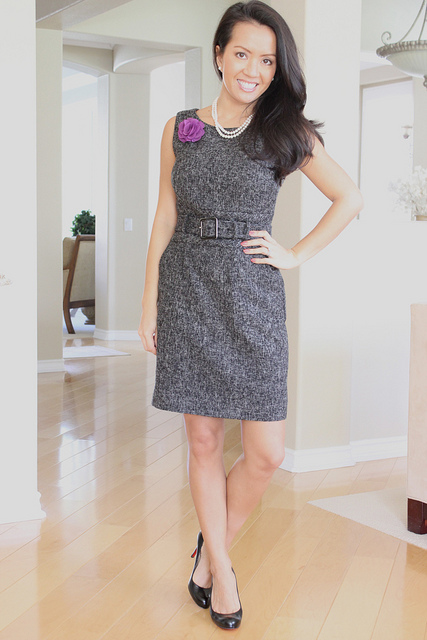
Dress: Banana Republic factory tweed sheath dress- size 00P (post alterations)
Shoes: Christian Louboutin Simple 100’s– size 35/5 (buy here)
Necklace: Pearls
Brooch: J.Crew purple flower pin
What are your thoughts on this DIY project? Will you attempt it?

Dress: Banana Republic factory tweed sheath dress- size 00P (post alterations)
Shoes: Christian Louboutin Simple 100’s– size 35/5 (buy here)
Necklace: Pearls
Brooch: J.Crew purple flower pin
What are your thoughts on this DIY project? Will you attempt it?



This is such a great idea! that little pop of colour on a simple outfit really makes a difference. great post!
You seem to do this DIY projects successfully and beautifully, lady 🙂 your instruction and pictures are easy to follow too.
yay for a DIY that i can actually do!! what a great score on these hair pins and they work as brooches beautifully! i'm definitely doing this DIY!
cute & little
What a neat idea! You did a great job for your first time. I'm not an artsy person myself, so I'm pretty impressed. LOL
OMG! How cute is that, and how talented are you, girl?! I want one.
This is really cute and I love the step by step photos. It was very helpful.
love this. totally brilliant. I'm so excited that I found your blog. I'm following now, I hope you will as well. I started my blog a little over a month ago. It's all about celebrity fashion from the point of view of an LA stylist. Stop by to see multiple post a day on all the latest celebrity fashion news. Would love your support. xoxo
http://www.fashboulevard.blogspot.com
This is a very simply DIY for those of us that are DIY challenged lol! Very cute!
Awesome DIY. I love how little projects like this can help make something, like the hair clip, into a more versatile.
Thank you for the super helpful tutorial! 🙂 I saw these flower pins at J. Crew but decided against them because I would much rather wear them as brooches…which I now can thanks to you! Will be attempting this as well! 🙂
o what a great DIY project! v cute 🙂 xoxo jcd :: stop by cornflake dreams im hosting a jewelry giveaway!
I loved this DIY project! It looked so simple yet the end results was so elegant. Thanks for sharing!
Anything that involves scissors and glue DEFINITELY counts as a DIY project! Nice job Annie!
That's so pretty! Thanks for this 😀
That's really neat! Its great to be able to do something DIY when you can't buy it!
easy breezy. mb in your giveaway, you can give us one of your hand made brooches.
thanks for the easy tutorial, Annie! i have tried this in the past too, but i didn't use the extra piece of felt fabric to hold it down for a more secure fit. will definitely try that next time 🙂
Great job, Annie! Even someone like me with two thumbs should be able to recreate this DIY 😛 I bought a couple Old Navy flower clips the other day and they had a pin and alligator clip side by side. Genius! That way on days when I don't want to poke holes through my clothes, the clips would come in handy. Just something I thought I'd throw out there for your future DIYs 🙂
Thanks for sharing, you look lovely. 🙂
xoxo,
Addie
The Cat Hag
This came out nicely, Annie. For my conversion attempt, I was too lazy to go to a store for glue and crudely hand stitched the felt piece on. Not recommended!
Annie & Jean – did you to plan this? So cool that there's a flower pin theme going on this week 🙂
@Jessica Thanks Jessica! It really does make a big difference and I love me some flower pins! 😀
@Nelah Awe…thanks Nelah! I was hesitating even doing this because of the simplicity but I figured if I wanted to do it, someone else would want to too:D
@kileen YAY! I hope you do Kileen! The JCrew flower pins are so pretty!
@The Little Dust Princess I am like the most NON-ARTSY person and extremely arts and crafts challenged…LOL
@PJ Oh PJ- you are way too kind to me…I am def NOT talented…but just wanted to share in case it helps at least one person..hehehe
@EveryDay Makeup blogThanks Becky! 😀
@Fash Boulevard YAY! Thx! So happy you found me..will def check out your blog:D
@Tara LOL…!!! I am def DIY challenged and figured if I can do it, then anyone can do it! LOL
@Danielle I contemplated keeping the hair pin but it was so bulky and I know I would never use it for my hair so I snipped it off 😀
@Elle Oh I hope you get them and try this Elle!!! You will LOVE it!! It's PERFECT 😀
@jillian :: cornflake dreams. Thanks Jillian!!! 😀
@featherfactor It's a simple DIY but it really is fantastic…LOL I was super happy with the end result and have already worn my brooches several times! Hehehe
Your DIY turned out so beautifully! I think we may have a new DIY resource to turn to!! 🙂
I love love love the banana republic dress! But even if I buy petite from BR I need to get altered 🙁
what a cute diy project, you did great! oh i just watched your chanel video, you're so cute! you have a great collection too, i'm so jealous!
Fashion Bag 411
@PetiteAsianGirl thanks Jean! I was pretty happy w/the results:-)
@Recovering Shopaholic LOL no we didn't but it worked out perfectly:-)
Hello there, You have done an incredible job. I’ll certainly digg it and personally
suggest to my friends. I’m sure they will be benefited from this website.
Hello! Someone in my Facebook group shared this website with
us so I came to check it out. I’m definitely loving the information. I’m
book-marking and will be tweeting this to my followers!
Outstanding blog and brilliant design.
My relatives every time say that I am wasting my
time here at web, however I know I am getting experience daily by reading thes fastidious articles.
Hurrah! In the end I got a web site from where I be able
to actually take valuable data concerning my study and knowledge.
Hiya very nice site!! Guy .. Excellent .. Wonderful ..
I’ll bookmark your site and take the feeds additionally?
I am happy to search out numerous useful information right here within the post, we’d like develop
more techniques in this regard, thank you for sharing.
. . . . .
Pastillas Cialis Funciona [url=http://levipill.com]vardenafil bestellen[/url] Viagra Super Active 2061 Buy Malegra Dxt 130 Mg Purchase Isotretinoin Price
Pretty! This was an incredibly wonderful post.
Thanks for supplying this information.
Nice blog! Is your theme custom made or did you download
it from somewhere? A theme like yours with
a few simple adjustements would really make my blog
stand out. Please let me know where you got your design. With thanks
Low Dose Viagra Supreme Suppliers India Viagra [url=http://demalan.com]viagra[/url] Generic Viagra Kamagra
Great writing to Read, glad that duckduck took me here, Keep Up awsome Work
I dugg some of you post as I thought they were very beneficial invaluable
google bring me here. Cheers!
Enjoyed reading through this, very good stuff, thankyou .
Appreciate it for this howling post, I am glad I observed this internet site on yahoo.
I was looking at some of your articles on this site and I believe this internet site is really instructive! Keep on posting .
Very interesting points you have remarked, appreciate it for putting up.
Yeah bookmaking this wasn’t a risky decision outstanding post! .
I must say, as a lot as I enjoyed reading what you had to say, I couldnt help but lose interest after a while.
I really enjoy examining on this page , it has got cool goodies .
Pompe Lioresal Support Order Cs Buy Accutane From Legal Chemist [url=http://catabs.com]priligy de 30[/url] Generic Viagra Echeck Pharmacy
Intresting, will come back here more often.
Hey, google lead me here, keep up great work.
Respect to website author , some wonderful entropy.
Hello, happy that i found on this in yahoo. Thanks!
I am not rattling great with English but I get hold this really easygoing to read .
Great, bing took me stright here. thanks btw for post. Cheers!
I must say, as a lot as I enjoyed reading what you had to say, I couldnt help but lose interest after a while.
This does interest me
I dugg some of you post as I thought they were very beneficial invaluable
I must say, as a lot as I enjoyed reading what you had to say, I couldnt help but lose interest after a while.
Hello, bing lead me here, keep up great work.
Thanks for this website. I definitely agree with what you are saying.
I am glad to be one of the visitors on this great website (:, appreciate it for posting .
stays on topic and states valid points. Thank you.
Deference to op , some superb selective information .
I have interest in this, danke.
Great article to Read, glad that duckduck took me here, Keep Up cool Work
Thank You for this.
I dugg some of you post as I thought they were very beneficial invaluable
Great, yahoo took me stright here. thanks btw for info. Cheers!
Levitra Mecanismo De Accion Tenormin No Script [url=http://getpharmacyonline.com]cialis vs viagra[/url] Elocon Buy Now Price Shipped Ups
Thanks for this article. I definitely agree with what you are saying.
Sildenafil Sale [url=http://sildenaf100.com]viagra[/url] Real Acticin Express Delivery Pills Free Consultation Phenergan Addiction
Enjoyed examining this, very good stuff, thanks .
Hello, i really think i will be back to your website